DIGITAL BANKING INSTRUCTIONS
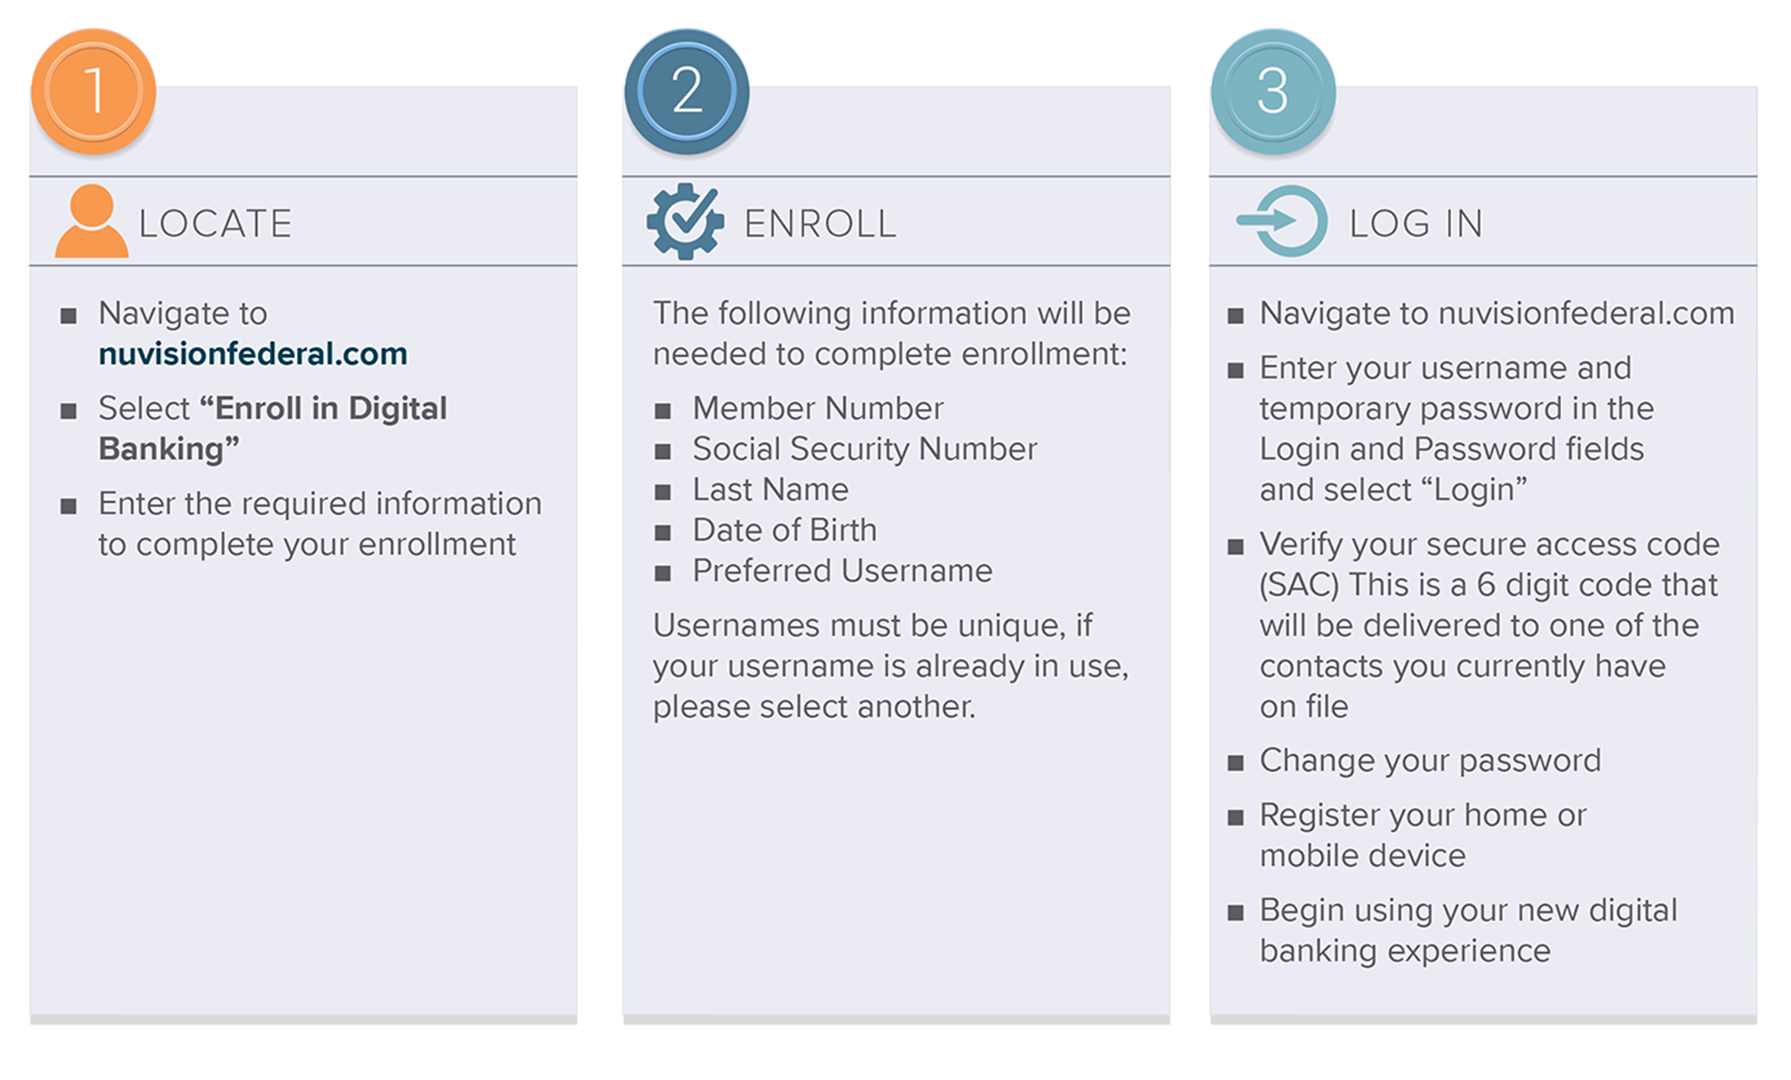
To enroll in Digital Banking, follow the steps below or start by clicking here.
DIGITAL BANKING INSTRUCTIONAL VIDEOS
Credit Card Loan Quick Payment
Adding an External Account
Verifying an External Account
Account to Account Transfers
ENHANCED AUTHENTICATION USER GUIDE
Enhanced Authentication provides an additional level of security to safeguard against phishing scams, credential theft, and online account takeovers (OATs). It simplifies the login process by providing easy options like biometric authentication, which makes it quicker and more convenient to verify your identity. Members are encouraged to follow these instructions for self-help. This guide provides simple, step-by-step instructions to help manage and protect your digital banking accounts. It ensures a safe and smooth experience while keeping your information secure.
Download the Enhanced Authentication User Guide
Follow these steps to enroll in Enhanced Authentication:
- At initial login, use the Secure Access Code (SAC) to authenticate your login
- Select the method to receive your Secure Access Code (SAC)
- Enter the Secure Access Code (SAC)
- A notification will be presented for “Experience heightened security”
- Once a trusted device is added you will be set up for enhanced authentication
b. If "Maybe Later” is selected, the option for "Experience heightened security" will be ignored, and it will reappear the next time you log in.
Manage trusted devices, browsers, and passkeys for secure authentication:
To Register a Trusted Mobile App:
- Once a mobile device is considered “trusted” you will only be prompted when certain transactions reach an amount determined to be high-risk
- Visit the Google Play or Apple Store from your new mobile device
- Download the Nuvision CU mobile app
- Log in to the Nuvision CU mobile app
- A push notification will be sent to the primary trusted device to add the new device
- Select “Yes” to confirm the login from the new device
- The device has been successfully linked; it will appear in the “Mobile Banking App” tab
To Register a Trusted Browser:
- Log into digital banking through a new browser
- A push notification will be sent to the primary trusted device to authenticate the request
- A prompt will display asking if you want to trust this new browser
- Click the “Trust this browser” button
- Your device has been successfully linked; it will appear in the “Trusted Browser” tab
To Register a Trusted Pass Key:
- Log in to digital banking
- Choose “Settings” from the navigation menu
- Select “Advanced Authentication” from the dropdown menu
- Select “Create Passkey On This Device” or “Mobile phone via QR Code” button
- Enter the device friendly name, e.g. “Jane’s iPhone 13”.
- Selecting “Create Passkey On This Device” a. You will be prompted to store the passkey using either biometric authentication or by creating a unique password for the passkey.
- Selecting “Mobile phone via QR Code” a. Scan the QR code using your mobile device and the passkey will be established on the mobile device
- The Passkey has been successfully linked; it will appear in the “Passkeys” tab
- Log in to digital banking
- Choose “Settings” from the navigation menu
- Select “Advanced Authentication” from the dropdown menu
- Click on the toggle option in the “Biometrics” section
- Select “Accept” to activate biometrics on your device
- A message will be displayed confirming that biometrics have been enabled for your device a. For future logins or transaction approvals, you’ll be prompted to authenticate using your biometrics instead of entering a password.
b. If biometric data changes (e.g., new fingerprint added), you’ll receive a notification and may need to re-enable biometrics
- Log in to digital banking from your primary trusted device on the mobile app
- Choose “Settings” from the navigation menu
- Select “Advanced Authentication” from the dropdown menu
- Under “Trusted Devices”, find the device marked as “Primary”
- Select the “Remove Device” option next to the primary device
- A push notification will be sent to the secondary trusted device
- Select “Yes” to remove the device from the Advanced Authentication page
- Once confirmed, the primary device is removed, and another trusted device will be promoted as primary
NOTE: If no other device exists, you’ll need to set up a new primary device before continuing.
FREQUENTLY ASKED QUESTIONS
Below is a list of categories with specific questions and answers tailored to each aspect of the upcoming online banking system.
Q: What is Enhanced Authentication?
A: Enhanced Authentication provides instant notifications and allows members to approve or reject account activity in real time. Using a mobile device or browser, members receive alerts that can be authenticated with biometrics or passkeys. This replaces the Secure Access Code (SAC) method, which relied on six-digit codes sent by email or text.
Q: What are the benefits of Enhanced Authentication?
A: Enhanced Authentication benefits include:
- Seamless login and navigation on trusted device(s)
- Interactive notifications sent to the trusted device(s) allowing for real-time decision making on logins, transactions and accessing services
- Reduced fraud incidents
- Reduced risk of unauthorized access and online account takeovers
Q: How can I add an additional trusted device?
There are three ways to add a trusted device:
To Register an Additional Mobile Device:
- Download the Nuvision CU mobile app on your new device
- Log in on your Nuvision CU mobile app
- A push notification will be sent to your primary trusted device to add the new device
- Select “Yes” to confirm the login from new device
- Your device has been successfully linked; it will appear in the “Mobile Banking App” tab on the Advanced Authentication page
To Register a Trusted Pass Key:
- Log into digital banking through a browser
- A push notification will be sent to the primary trusted device to authenticate your request
- Choose “Settings” from the navigation menu
- Select “Advanced Authentication” from the dropdown menu
- Select “Create Passkey On This Device” or “Mobile phone via QR Code” button
- Enter your device friendly name, for e.g. “Jane’s iPhone 13”
- Select “Create Passkey On This Device” a. You will be prompted to store the passkey using either biometric authentication or by creating a unique password for the passkey.
- Select “Mobile phone via QR Code” a. Scan the QR code using your mobile device and the passkey will be established on the mobile device
- Click the “Register” button
- Your device has been successfully linked; it will appear in the “Passkeys” tab on the Advanced Authentication page
To Register a Trusted Browser:
- Log into digital banking through a new browser
- A push notification will be sent to the primary trusted device to authenticate the request
- A prompt will display asking if you want to trust this new browser
- Click the “Trust this browser” button
- Your device has been successfully linked; it will appear in the “Trusted Browser” tab on the Advanced Authentication page
Q: What is a trusted device?
A: A trusted device is a phone, tablet, or computer that is securely linked to your digital banking profile. It allows you to verify your identity and authorize transactions safely, offering a reliable and convenient user experience by combining heightened security measures to safeguard your digital banking activity.
Q: What is a push notification?
A: A push notification is presented on your phone directly through the mobile app and will display on-screen to review. These notifications are interactive and when accessed they will present you with the opportunity to authorize or reject activities occurring within digital banking.
Q: What is a passkey?
A: A passkey is like a digital “key” that is stored on your phone or computer. Instead of entering a password, you can use this key for authentication. Because the key is tied to the trusted device, it is resistant to phishing and other cyber-attacks that could compromise your information.
Q: What is biometric authentication?
A: Biometric authentication utilizes distinct biological features to confirm your identity. It compares physical attributes with saved authentication data for verification. If the biometric data samples match, authentication is successfully completed.
Q: Does the mobile app need to be updated?
A: Yes. A new version of Nuvision's mobile banking app will need to be downloaded.
Q: Can I register more than one trusted device?
A: Yes. You may have multiple trusted devices but only one primary trusted device for receiving push notifications.
Q: Will I need to reset my account nicknames within the new system?
A: No. All of your account nicknames will stay the same during the transfer process.
Q: What should I do if my trusted device is lost?
A: Please contact the Member Contact Center at 800-444-6327 to verify your identity and remove the device from your trusted devices list.
Q: What happens if a login attempt or transaction is initiated from an untrusted device?
A: A push notification will be sent to the trusted device notifying you of the attempt with the device or browser type. You will have the option to approve or reject the login attempt.
Q: What if I receive an authentication request that I did not initiate?
A: Upon receiving the push notification, select “No, it’s not me” to decline the activity. Notify Nuvision Credit Union to prevent any further attempts by potential fraudsters.
Q: What does it mean when an authentication request “times out”?
A: A “timeout” can occur if the authentication response exceeds the allotted time or when message delivery to your mobile device is delayed.
Q: Can I use a tablet as my trusted device?
A: Yes. Any mobile device that allows for the download of Nuvision’s mobile banking app can be used as a trusted device and will receive push notifications.
Q: What if I accidentally declined a transaction I meant to approve?
A: The “Authentication Failed” message will display on your digital banking screen to notify you the transaction was cancelled. You may then reinitiate and approve the transaction.
Q: What is the average time it takes for an authentication request to appear?
A: Authentication requests usually appear within 5–10 seconds if the app is closed and must be awakened. If the app is already open, requests should appear almost instantaneously. These times may be impacted by cell network or Wi-Fi network reception strength.
Q: Will the authentication work outside the US?
A: Yes. You will still receive the notifications to your mobile device if a signal is available. If you are overseas, you are no longer restricted in receiving methods since the notifications are not sent by SMS/Text.
Q: Is there a fee to authenticate?
A: There is no charge to authenticate.
Q: Will I need to reset my account nicknames within the new system?
A: No. All of your account nicknames will stay the same during the transfer process.
Q: Will I receive email bill pay reminders?
A: Yes, if you have selected that option.
Q: Will Bill Pay remain a free service?
A: Yes.
Q: How many days does it take to send an average payment? How many days in advance do our members need to create payment?
A: When submitting a payment, the system will provide you with the sent date and delivered by date. Additionally, the member can decide what date works best for their schedule.
Q: If a check is mailed out to a payee and the check is lost, can I place a stop payment on the check? What is the fee?
A: The request must be made by contacting the Contact Center or by visiting a branch. There is a $30 fee.
Q: Will my existing reoccurring payments and/or reminders be set up?
A: Yes, as long as the payee is converting over. However, if your payment was setup based off of an e-bill, it will need to be reestablished.
Q: Will my bill payments/payees carry over?
A: Yes!
Q: Who can I contact if a payment is not received as scheduled?
A: Please reach out to the Contact Center 800.444.6327
Q: How much history will convert within the new Bill Pay platform?
A: Six months’ worth of history.
Q: Can payments be set up as electronic or do they all send out checks?
A: If the biller has an established relationship with Bill Pay, the payment will be sent electronically. If they do not have an established relationship, it will be sent out via check. When setting up the payee on bill pay, the system will advise you on how the payment will be sent. The bill pay system will also advise you on the delivery date of the item.
Q: Do I need to reregister to access my credit card information?
A: No, all your credit card information will roll over into the updated online banking
system.
Q: Can I view my credit card information online and be able to make ACH payments from an outside institution?
A: Yes. The process will not change and credit card information and setup of payments can be accessed by clicking on the "Credit Card" link.
Q: Do I have to set up my Institution to Institution transfers again?
A: Yes. The new feature is called an “External/ACH Transfer.”
Q: Will I be able to make loan payments from an external bank account?
A: In order to make a payment to your loan from an External Account you would need to re-establish an External Account with our new online banking platform first. To do so simply select the option to "Add/Verify External Account". You will be able to locate the option under the "My Accounts" tab from the top menu. Please allow 3-5 business days for the MICRO Deposits to be complete. Once the account has been validated you will be able to complete the transfer to your loan in the future.
Should you need any additional assistance please contact us at our Call Center Monday through Friday from 7:00am to 6:00pm (PST) and Saturdays from 8:00am to 2:00pm (PST) at 800-444-6327 option “8”. Our Secure Chat feature is also available between the hours of 9:00am to 5:00pm (PST) Monday through Friday.
Q: Can I make more than the minimum payment due at the time on my loan or do I still have to schedule an additional payment?
A: Yes.
Q: Will I have to reset my fingerprint authentication?
A: Yes. Once the app is uploaded, simply reset it in the phone's settings.
Q: Will there be a message that will notify that the app is no longer available and to download the new one?
A: Yes, iOS users will automatically be directed to App store to update the app. Android users will receive the following message: "The current Nuvision app is no longer in service due to the upgraded online banking system. Please download the new version of the Nuvision app available at on the Google Play store."
Q: Do I have to re-register to access my mortgage loan?
A: No.
Q: I use Quicken/Quickbooks for money management. Do I have to update or do anything within the new system?
A: Yes, you will need to reset up your connection from Direct Connect to Web Connect (manually download transaction history from online banking and upload them in Quicken/QuickBooks) or Web Express Connect by simply connecting with your online banking login credentials.
Q: What versions of Quicken/QuickBooks does the credit union currently support?
A.
- QuickBooks Mac 2019
- QuickBooks Mac 2020
- QuickBooks Windows 2017
- QuickBooks Windows 2018
- QuickBooks Windows 2019
- QuickBooks Windows 2020
- Quicken Mac 2017
- Quicken Mac 2018
- Quicken Mac 2019
- Quicken Windows 2018
- Quicken Windows 2019
Quicken Mac/Windows 2020 – Coming Soon!
Q: I use Mint for money management. Do I have to update anything?
A: Yes, you would need to re-authenticate your Nuvision log in credentials directly with Mint to re-establish that connection again.
Q: Will I need to reset recurring transfers?
A: No, members will not need to reset any recurring transfers.
Q: Can a Skip-a-Pay be requested by a joint owner?
A: No
Q: Will I still be able to make a loan payment online to my energy/solar loan from an outside institution?
A: Yes.
Q: How much history would convert to the new system?
A: 18 months of transaction history will be available. Additionally, there will 2 years of statements available.
With the new digital banking system now here, the hidden account feature has been updated. Due to this change, you’ll need to re-hide your previously hidden accounts.
The instructions below explain how to hide your accounts and of course if you want to view the hidden accounts again, you will be able to unhide the account within your profile.
Step 1: From the Home, select Account Preferences from the Settings Dropdown.

(Note: For the
Details display for this account, click on the Visible Button under the Details header
.)


If there are any questions regarding the new online banking system, please call 800.444.6327 for additional details.


